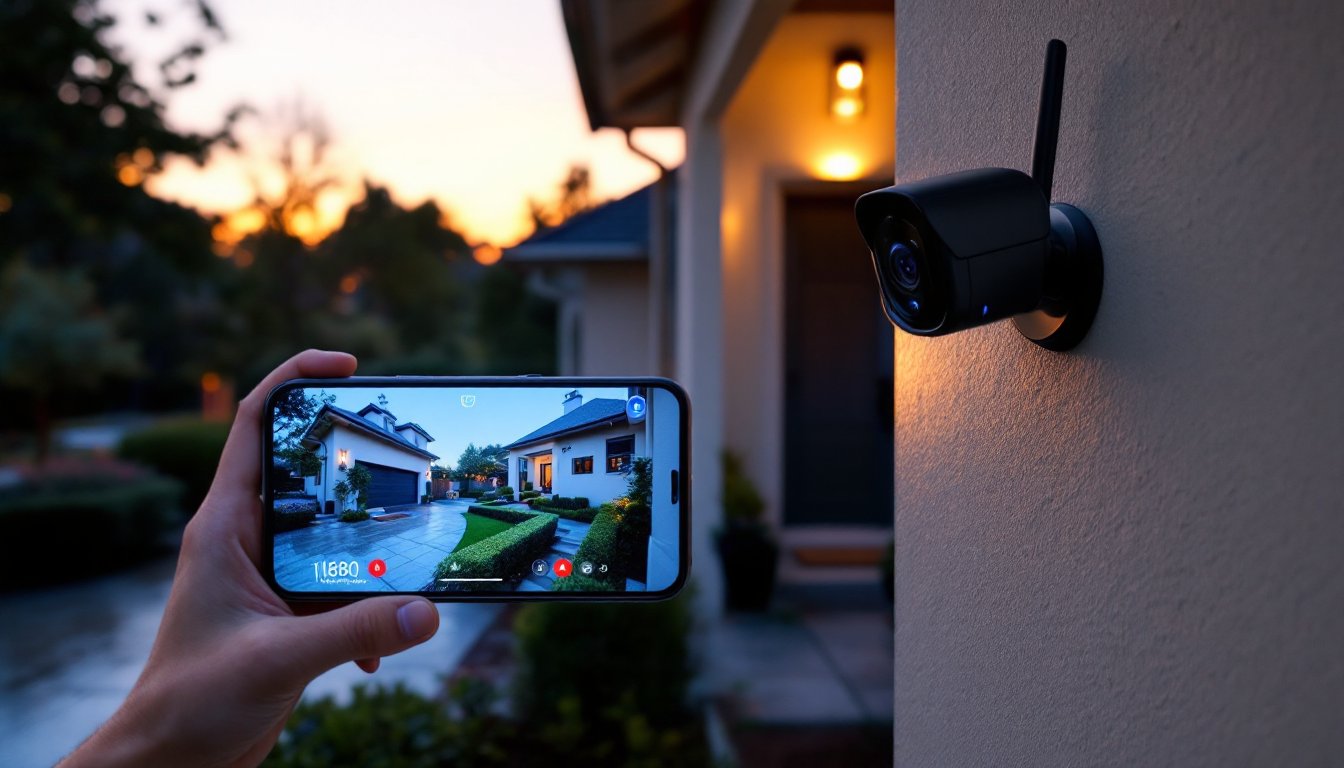
Installing security cameras is one thing. Actually watching what they record, or having someone else watch in real time, is another. Live security camera monitoring gives homeowners the ability to see what’s happening on their property as it unfolds, not hours later when reviewing footage. It’s a layer of protection that can mean the difference between catching an intruder in the act and simply documenting a break-in after the fact. Whether you’re considering a professional monitoring service or planning to self-monitor from your phone, understanding how these systems work and what they require will help you make the right choice for your home’s security needs.
Table of Contents
ToggleKey Takeaways
- Live security camera monitoring enables real-time threat response instead of reactive footage review, allowing you to act within seconds when motion is detected at your property.
- Two-way audio and remote access through live monitoring systems deter intruders and enable property oversight without being physically present, from catching porch pirates to verifying contractor work.
- Choose between professional monitoring services ($15-60/month) for 24/7 expert verification and emergency dispatch, or DIY self-monitoring for complete privacy and lower costs, with many homeowners combining both approaches.
- Successful live security camera monitoring requires reliable upload speeds (5+ Mbps), proper camera placement 7-9 feet high with 1080p minimum resolution, and customized motion detection zones to reduce false alerts.
- Maintain your system by cleaning lenses quarterly, using strong passwords and WPA3 WiFi encryption, documenting camera locations, and testing the full system quarterly to ensure alerts and video quality work when you need them.
What Is Live Security Camera Monitoring?
Live security camera monitoring is the continuous or on-demand viewing of video feeds from security cameras as events occur. Unlike standard recording systems that store footage for later review, live monitoring provides real-time visibility into what’s happening at your property right now.
These systems typically stream video over your home network to the internet, allowing access through smartphone apps, desktop browsers, or dedicated monitoring stations. The feed can be viewed by the homeowner, a professional monitoring service, or both, depending on the setup.
Most modern systems use motion detection and AI-powered alerts to flag potential security events, triggering notifications that prompt someone to check the live feed. This prevents the need to stare at screens all day while still maintaining active surveillance.
How Live Monitoring Differs from Standard Security Cameras
Standard security cameras record video to local storage (like an SD card or DVR) or cloud servers for later playback. They’re reactive, you review footage after something happens. Live monitoring is proactive, enabling immediate response to threats.
The key differences:
- Response Time: Standard cameras require you to notice something’s wrong, then review footage. Live monitoring alerts you instantly, allowing real-time action like calling police or activating alarms.
- Human Verification: Some live monitoring services include professional agents who verify threats before dispatching emergency services, reducing false alarms from passing animals or delivery drivers.
- Internet Dependency: Live feeds require stable, high-speed internet. Standard recording can function with local storage even if your network goes down.
- Bandwidth Usage: Streaming HD video continuously eats up 1-4 Mbps per camera. Multiple cameras monitored simultaneously can strain home networks with limited upload speeds.
Standard cameras work fine for documenting package theft or reviewing who visited. Live monitoring is built for active security management.
Key Benefits of Live Security Camera Monitoring for Homeowners
The primary advantage is immediate threat response. When a camera detects motion at 2 a.m., you can pull up the feed, see exactly what’s happening, and decide whether to call authorities, all within seconds. That speed matters when someone’s trying to jimmy your back door.
Deterrence through interaction is another major benefit. Many systems include two-way audio, letting you speak directly through the camera. A voice booming from a speaker telling someone they’re being recorded often sends them running. It’s particularly effective for porch pirates who don’t expect real-time engagement.
Remote property management becomes practical with live monitoring. Homeowners can let service workers in remotely, verify contractors actually showed up, or check that the garage door closed after leaving for vacation. It’s oversight without needing to be physically present.
Reduced false alarms save money and hassle in areas where police departments fine repeated false dispatches. Professional monitoring services review alerts before calling emergency services, filtering out the mail carrier or neighborhood cat that would otherwise trigger a panic.
Insurance benefits sometimes apply. Some home insurance providers offer premium discounts for professionally monitored security systems, typically 5-20% depending on the carrier and coverage level. Check with your insurer about specific requirements.
Multi-property monitoring from a single interface helps homeowners managing rental properties, vacation homes, or caring for elderly family members in different locations. One app can display feeds from multiple addresses simultaneously.
Choosing the Right Live Monitoring System for Your Home
Start by evaluating your property’s layout and vulnerability points. How many cameras do you actually need? Most homes require 3-5 cameras covering front/back doors, driveway, and any secluded side access. Larger properties or those with detached structures need more.
Camera specs matter for live monitoring. Look for:
- Minimum 1080p resolution for identifying faces and license plates
- Night vision range of 25-30 feet for adequate low-light coverage
- Motion detection zones you can customize to ignore street traffic while catching driveway activity
- Weather rating of IP65 or higher for outdoor cameras (IP66 or IP67 for areas with heavy rain or snow)
- Field of view between 110-130 degrees balances coverage area with image clarity
Network infrastructure is non-negotiable. You’ll need upload speeds of at least 5 Mbps for reliable multi-camera streaming, more if you want 4K feeds. Wired ethernet connections to cameras eliminate wireless dropout issues, though running Cat5e or Cat6 cable through walls requires fishing skills or hiring an electrician.
Power over Ethernet (PoE) cameras simplify installation by carrying both data and power through a single cable. This eliminates the need for separate power adapters at each camera location, but requires a PoE switch or injector, typically $60-150 depending on port count.
Storage considerations: Cloud storage usually costs $3-10 per camera monthly for 30-day retention. Local storage via Network Video Recorder (NVR) has higher upfront costs ($200-600 for quality units) but no recurring fees. Hybrid systems offer both.
Professional Monitoring Services vs. DIY Self-Monitoring
Professional monitoring means trained personnel watch your feeds or respond to alerts 24/7. Services typically cost $15-60 monthly depending on the number of cameras and response features. Someone’s always on duty to verify threats and contact emergency services with your address and situation details already in their system.
Pros:
- No requirement for you to constantly check alerts
- Faster emergency dispatch since monitoring centers have direct lines to local authorities
- Professional verification reduces false alarm fines
- Works even if your phone is off or you’re unavailable
Cons:
- Ongoing monthly costs add up to $180-720 annually
- Usually requires contract commitments of 1-3 years
- Less flexibility in system customization
- Privacy concerns about third parties accessing your video feeds
DIY self-monitoring means you receive alerts and review footage yourself. Initial equipment costs are often lower, with quality camera systems starting around $200-500 for a basic 2-4 camera setup. Cloud storage is optional, many systems let you use local SD cards or NVRs.
Pros:
- No monthly monitoring fees (though cloud storage often costs extra)
- Complete privacy, only you access your feeds
- Flexibility to expand or modify the system anytime
- Direct control over when and how to respond
Cons:
- You’re responsible for checking every alert, miss the notification, miss the event
- Requires your phone to have signal and battery
- You handle all emergency calls yourself
- Vacation or sleep means reduced vigilance
Many homeowners split the difference: DIY equipment with professional monitoring added only during vacations or high-risk periods. Services from companies reviewed on technology comparison sites often allow month-to-month monitoring without equipment contracts.
Setting Up Your Live Security Camera Monitoring System
Before drilling any holes, map your camera locations. Walk your property’s perimeter noting where power outlets exist, sightlines that cover vulnerable entry points, and potential obstructions like tree branches or eave overhangs. Cameras should mount 7-9 feet high, low enough to capture faces clearly, high enough to resist tampering.
Materials and tools you’ll need:
- Security cameras (quantity based on coverage plan)
- Mounting brackets (usually included with cameras)
- Screws and anchors appropriate for mounting surface (lag bolts for wood, concrete anchors for masonry)
- Drill with bits matching anchor size
- Screwdriver or impact driver
- Cable clips or conduit for organizing wires
- Weatherproof junction boxes for outdoor electrical connections
- Ethernet cable (Cat5e or Cat6) if using wired cameras
- Ladder tall enough to safely reach mounting points
- Level tool
- Silicone sealant for weatherproofing screw holes
Safety first: Wear safety glasses when drilling overhead. If mounting near power lines or climbing above single-story height, consider hiring a professional. Check local ordinances, some jurisdictions require permits for hardwired security system installation.
Step-by-step installation:
-
Test cameras before mounting. Plug them in, connect to your network, and verify the live feed works through the app. Troubleshooting is much easier before they’re 9 feet up a wall.
-
Mount the bracket first. Hold it against the wall, mark screw holes with a pencil, then drill pilot holes. For masonry, use a hammer drill with a masonry bit sized for your anchors.
-
Run cables before final mounting. If using wired cameras, drill through the wall behind the bracket (typically a 5/8-inch bit works for most cable bundles). Use a stud finder to avoid framing members unless you intentionally want to mount to a stud for maximum strength.
-
Seal penetrations. Apply silicone sealant around any holes drilled through exterior walls to prevent water intrusion. This step prevents major headaches from moisture damage later.
-
Attach cameras and adjust angles. Most cameras have ball joints or tilt brackets. Aim for slight downward angles that capture the 10-15 feet in front of the camera where intruders will actually be, not the sky or your lawn.
-
Configure motion zones in the app. Draw boundaries that exclude sidewalks, streets, or swaying branches that would trigger constant false alerts. Focus on doorways, driveways, and pathways.
-
Set up notifications based on your monitoring preference. If self-monitoring, enable push notifications for motion events. If using professional monitoring, configure which alerts get escalated to the service.
-
Test the full system by walking through camera coverage areas at different times of day. Verify night vision activates properly and motion detection captures events without delays.
For systems integrating with smart home platforms, connect cameras to your hub now. This enables automation like turning on exterior lights when cameras detect motion or sending alert clips to a smart display.
Best Practices for Effective Live Camera Monitoring
Organize your alerts by priority level. Not every motion event deserves immediate attention. Configure your system to distinguish between high-priority zones (doorways, ground-floor windows) and lower-priority areas (sidewalks, street-facing cameras). Some advanced systems use AI to differentiate between people, vehicles, and animals, features often highlighted in home technology reviews, reducing the alert fatigue that causes homeowners to ignore notifications.
Establish a response protocol before an actual emergency. Who gets called if you see an intruder? What’s the non-emergency police number for your jurisdiction? Having a plan prevents panicked decision-making at 3 a.m.
Maintain your system regularly:
- Clean camera lenses quarterly, spiderwebs, pollen, and rain spots degrade image quality
- Check camera positioning after storms or high winds
- Test backup power systems monthly if you have battery or UPS backup
- Update firmware when manufacturers release security patches
- Review and archive important footage before cloud retention periods expire
Secure your network. Live camera feeds are a target for hackers. Use WPA3 encryption on your WiFi (WPA2 minimum), change default camera passwords to strong unique credentials, and enable two-factor authentication on your monitoring app. Never use the same password across multiple cameras.
Consider bandwidth management if you have multiple cameras. Most systems let you adjust streaming quality, use high resolution only when actively viewing, lower quality for continuous background monitoring. This prevents your security system from crippling home internet performance.
Document your system with a simple map showing camera locations, account credentials (stored securely), and emergency contacts. If someone else needs to access the system while you’re unavailable, this information is invaluable.
Know the legal boundaries. Cameras can monitor your property and areas visible from your property, but pointing them directly into neighbors’ windows or recording audio in two-party consent states without disclosure creates legal liability. When in doubt, angle cameras to focus on your own entry points and pathways.
Balance security with privacy. Not every room needs a camera. Bedrooms and bathrooms should remain private spaces. If you have housekeepers or contractors, inform them of camera locations, hidden surveillance of service workers creates legal issues in many states.
Finally, test your entire system quarterly by having a family member or friend trigger cameras while you monitor remotely. This verifies that your alerts work, the app connects properly, and video quality remains adequate for identifying threats. Most system failures get discovered during emergencies, better to find problems during a drill.